Posts

Compare Godaddy CRM

Vitiger: can not create your own module, can not create your own menu SugarCRM: you can do create own module, crate your own menu. but you can not customize the default home page. you need edit the modules/Home/index.php file to Achieve this purpose. and SugarCRM Community Edition End of Life so you'd better not use this anymore. SuiteCRM: can  create your own module item I am still not find a way to add comments filed

北美卖车记

我们的小车已经陪伴了我们将近12年了,也该换了。 当时先考虑的是 trade in. 因为如果 trade in 的话,是直接抵新车价格。这样交的稅就少了。等于又节省了一些。但是BMW 只给900。Lexus给1900。我自己上网查了一下。发现这个型号,年代,公里数的二手车均价是4200到4500。于是决定自己卖。 对 放到 kijiji 上卖 就肿么办。于是拍照上网。特意在周四放了上去 价格定在4800。结果周末竟然无人问津。上网一看才知道放错了地方,网站自动给删了 我了个去。 重新贴 这回客户如云。正好女儿在OU有比赛 于是在OU 看车。虽然下着小雨 还是约了 3家来看。头一家来了2个中东人 试驾完了说很喜欢但只给3500。果断拒绝。第二家说突然有事 来不了了。 第三家来了两个当地老头 穿着工作服 看着像车行的人 围着车转了一圈 连试都没试 说了一声还要看一个车 就走了。 周日继续 这回约在 bayshore 来了一个老黑 五大三粗 说这车对他来说 小了些 出价 3300 还是果断拒绝。 期间接到不少短信 出价3000 到 3500 不等 这些一律回绝 还没看就这个价 来了还得砍 坚决不干。 然后因为不是周末 看的人少了不少 但也有人来 到了周四 约了一对老夫妻 是他们女婿帮着约的 约在我们附近的中学 看的 这回老婆亲自出马 小嘴 bla bla 一说 云山雾罩 天花乱坠 俩老夫妻 当场晕菜 拍板 4200 周六过户 临走还主动交了 50押金。回家以后老婆得瑟的 标榜自己是一个成功的销售 然后整理资料 发现安检证书过期了 才知道这玩意儿36天过期 当时决定卖车 就做了一个 太轻率。赶紧预约 附近的安检点没档期了 约了25公里外的一家 周五做的 又化了170。 到了周六 老夫妇说先让他们朋友的车行看看 再去过户 我们一起去了 他们朋友开了前盖 指着一个圆瓶上面的锈迹说 车里面的压力都经过这里 如果锈出洞 会爆炸 很危险。老夫妻决定不要了。原先想下午取新车的 老婆心情不好 于是决定不取了。回头再说。 回家立马重新贴广告。当晚又有不少人来短信 竟然有一个出2000的 我连短信都懒得回。周日下午约了个附近乡村的人 正好去 Wal-Mart 随便看车 他是他是车行的 搞旧车翻新 机械上的事情自己就能搞定 开价 3600 老婆的预期已经下降到低点 竟然同意了 那人又转了一圈...

人生

人生就是一个大裤衩,什么屁都得兜着。

How to download Adobe Photoshop CS2 for free and legally

Image
Sign up an account from adobe.com It is free then go to support-> download and install then go to other download->photoshop cs2 From there you can find free full version of Download Acrobat 7 and CS2 products

Editing a Batch of Images in Photoshop

Image
How to resize multiple images in Photoshop CS 1 open a image 2.Make sure actions panel was enabled 3. create new action 4. Choose a name for your action. Here, we're resizing our images to 400x300 pixels wide, so we've named it '400x300'. You can then choose whether you want the action to be stored within the 'Default' set or a separate one you've created. (Create new sets by clicking the folder icon mentioned earlier). If you'd like to create a shortcut to make the action easier to perform, you can do so by choosing a function key from the drop-down menu, and checking shift and/or command. You can also colour-code the action if you want to. Once you've chosen the name of the action, the set, the shortcut and the colour, you now need to record your action.    Photoshop will begin to record and save an action then apply this to a batch of images. 5.go to Image > Image Size  6.click OK, go to file -> save as  then cho...

Seagate Toolkit has stopped working

Image
first solution: install Seagate dashboard. it has more function than toolkit second solution: do all windows updates and check device manager to see if you have all the device driver installed

MS publisher Show and print crop marks

Image
Go to File->Print. Then click the pull-down menu for your printer Click Advanced Output Settings. Do the selection as below: Here is the preview:

phpmyadmin 中文 显示 乱码 问题 解决

first, add : charset=gb2312 在 meta 里面 to your ”head“ second: add : $link = mysql_connect(DB_HOST, DB_USER, DB_PASSWORD); mysql_query("set names 'gb2312'"); // this line very important!!! third: creat data base like this: //see gb2312 and utf8_unicode_ci. important!!! CREATE TABLE IF NOT EXISTS `user` ( `id` int(11) NOT NULL AUTO_INCREMENT, `name` varchar(200) CHARACTER SET gb2312 NOT NULL, PRIMARY KEY (`id`) ) ENGINE=MyISAM DEFAULT CHARSET=utf8 COLLATE=utf8_unicode_ci AUTO_INCREMENT=39 ; fourth: MySQL 连接校对:utf8_unicode_ci

4 线 网线 和 2 线 电话线

cat5 4 pin 1,2,3,6 telephone cable in the middle two.

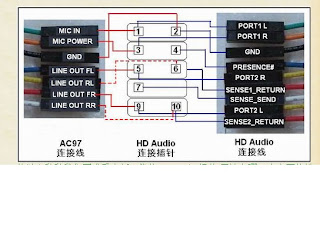
AC97 与 HD AUDIO 接线方法

Image

make BisonCam work for XP

It also work for the MSI L745 notebook first, use this INF file C:\WINDOWS\OPTIONS\Install\x86\BisonCam.inf ;------------------------------------------------------------------ ;------------------------------------------------------------------ ; ; BisonCam.INF -- This file contains installation information ; For windows NT ; Copyright (c) 2004 ; DSP : ALI-5603C ; Sensor: VGA OVT-7640/7648/7649,MT9V011(MI360),HV7131R ; 1.3M OVT-9620/9630/9640,MT9001C12ST,HV7151SP ; ;------------------------------------------------------------------ ;------------------------------------------------------------------ [Version] Signature="$CHICAGO$" Class=Image ClassGUID={6bdd1fc6-810f-11d0-bec7-08002be2092f} Provider=%VENDOR% CatalogFile=BisonCam.cat DriverVer=08/20/2007,6.32.0.07 ; All PnP devices should be excluded from manual AddDevice Applet list [ControlFlags] ExcludeFromSelect=* [Manufacturer] %Mfg%=CamM5603D.Section [DestinationDirs] DefaultDestDir ...

修複報廢硬盤

许多人遇到BIOS中检测不到硬盘或报错的时候,就将其报废。其实,如果开机后,硬盘在自检时能听到磁盘旋转的声音,估计主电机和控制电路板均无故障,还是有挽回余地的。需要注意的是,硬盘是一种精密的器件,很脆弱,维修前应先将双手洗净,释放掉人体残存的静电再进行操作。    无法找到硬盘的情况   对于出现“HDD NotDetected”错误提示的硬盘,首先检查硬盘外部数据信号线的接口是否有变形,接口焊点是否存在虚焊。排除以上的可能后,取下硬盘后盖,露出电路控制板。拧下控制板上的固定螺丝,将控制板与硬盘主体分离。这时可以看见硬盘主体的两排弹簧片。一排作为主电机的电源,另一排作为硬盘主体的磁头机械臂驱动线圈电源以及硬盘主体与电路控制板间数据传输接口。对于无特殊封装的硬盘,往往可以看见弹簧片与控制电路板对应部位均有灰尘。用脱脂棉蘸无水酒精清洁,对弹簧片变形的部位校形,并除去氧化层,一般情况下均可恢复正常。   如果以上处理无效,那就得打开硬盘主体。选择一个灰尘很少的环境,拧开硬盘前盖的螺丝(有的是用胶粘牢)。取下硬盘的前盖,这时就可清楚地看到盘面。首先用数字万用表检测磁头机械臂驱动线圈是否断路。该线圈的正常阻值为20Ω左右。其次检测磁头上的连线是否断开。每张盘面的两侧均有一个磁头,每个磁头均有两根连线接到磁头机械臂上的集成芯片上。该芯片常见的型号为H1710Q,作用是将磁信号转变为电信号,再送到电路控制板处理。磁头阻值应在23Ω~26Ω之间。若磁头阻值较大,说明磁头损坏。磁头连线与芯片H1710Q相连,H1710Q对应脚阻值应在1.7kΩ左右,若在1.2kΩ以下说明该芯片已被击穿,可与排线一起更换。   若磁头上的连线断路,可用直径0.2mm的优质漆包线取代。一端压在磁头的金属弹片上,另一端焊在H1710Q相应的脚上。注意将漆包线卡在机械臂相应的卡槽内,并用少许502胶水固定,防止硬盘转动时与漆包线相摩擦。将硬盘各部分复原后,最后用702硅胶将硬盘周围封死,防止灰尘进入。由于磁头体积很小,不易将漆包线卡在上面,最好在放大镜下操作。这时千万不可用力过猛,否则会造成磁头损坏,所以要小心加小心。经这样修复开机后硬盘可恢复正常。   提示硬盘出错的情况   对于出现提示“HDD ControllerError”错误的硬盘,大都是由于某种原因造成硬盘主引导记录(MBR)上文件受损。MBR...

Send email by using PHP

if your ISP need SMTP Authentication then you need Pear installed for you php5, and also add one line in your php.ini file: extension=php_gd2.dll require_once "Mail.php"; $from = "Sandra Sender "; $to = "Ramona Recipient "; $subject = "Hi!"; $body = "Hi,\n\nHow are you?"; $host = "househosting.ca"; $username = "smtp_username"; $password = "smtp_password"; $headers = array ('From' => $from, 'To' => $to, 'Subject' => $subject); $smtp = Mail::factory('smtp', array ('host' => $host, 'auth' => true, 'username' => $username, 'password' => $password)); $mail = $smtp->send($to, $headers, $body); if (PEAR::isError($mail)) { echo(" " . $mail->getMessage() . " "); } else { echo(" Message successfully sent! "); } ?>

Cannot modify header information - headers already sent by

Solution #1 - no output before header(), setcookie() and other header setting functionsThus, the first solution to the "Cannot modify header information" error is to make sure you are not outputting any content at all before the call to the header() function. Solution #2 - ob_start() The second method consists in calling the ob_start() at the very top of the PHP script like this: ob_start(); This will turn output buffering on. With output buffering the entire PHP script will be processed before any output is sent to the client. Thus all the PHP script will be aware of all the header changes and it will not send any headers until every line has been processed.ob_start() may appear to slow down the loading time on server intensive pages, because the client will not be presented with any fragment of the page until the page is fully processed.

How to load data file to mysql

copy xx.sql file to your mysql\bin forlder than login to mysql mysql> source xx.sql;

解决sub 2000 shop 有一些button看不见的问题

很简单,是因为字体被改成了中文的缘故,改成english就好了

FireFox 加速

1. 在 Firefox URL欄內輸入「about:config」 2. 在「Filter」欄內輸入「pipelining」將找到以下三個設定 3. 將 「network.http.pipelining」調為 true 4. 將 「network.http.proxy.pipelining」調為 true 5. 將 「network.http.pipelining.maxrequests」調為 30 6. 最後一步就是在Firefox任何一個地方點右鍵,選擇「新建」—「整數」在彈出的對話框中輸入「nglayout.initialpaint.delay」並將其值改為「0」,表示當瀏覽器收到網站回復的信息後能夠快速的反應。 7. 重新開啟 Firefox 便完成設定

Install IIS 6 + PHP5.2.5 + MySQL in WIN 2003 (PART2)

Today let's lean how to set MySQL. 1. Download MySQL5.0.51a from http://dev.mysql.com/downloads/mysql/5.0.html 2. Unzip it to your C: drive. Then click setup.exe 3. Select "typical" installation.-->standard configuration-->install as windows service-->set new root password (write it down somewhere, otherwise....) 4. Now you can see Mysql in C:\Program Files\MySQL 5. Want access the database? Go to start-->all programs-->MYSQL-->MySQL server 5.0-->MYSQL command line client. 6. Read MYSQL tutorial from this link http://webhelp.ucs.ed.ac.uk/services/mysql/example1-cli.php 7. Add C:\PHP to your path. From the Start menu, right click My Computer and select Properties. From the Advanced tab click the Environment Variables button. Under System Variable find Path and click Edit. At the end of what is already present in Variable Value add a semicolon (;) and then C:\PHP. 8. If you can see it, Then your are success set up MYSQL, simple ! C:\mysql\bin\mysql.exe ...

Install IIS 6 + PHP5.2.5 + MySQL in WIN 2003 (PART1)

Don't know why after I install sharepoint 3, the default web site can not see php file, always ask my password. so I reinstall PHP again. It works for me.... INSTALL PHP 1. Download PHP from http://www.php.net/downloads.php 2. Unzip it to c:\PHP 3. Copy php5ts.dll from c:\PHP to C:\WINDOWS\system32 4. Copy php.ini-dist from c:\PHP to C:\WINDOWS then change the it's name to php.ini 5. Open C:\WINDOWS\php.ini in notepad Change extension_dir = "./" to extension_dir = "C:\PHP\ext" Change ;extension=php_mysql.dll to extension=php_mysql.dll (just delete ";") 6. Open the Internet Information Services (IIS) Manager from start-->Administrative Tools-->local computer-->web sites-->default web site-->right click then select properties-->home directory-->select configration-->under Cache ISAPI extensions click add-->Enter C:\PHP\php5isapi.dll as Executable and .PHP as Extension. Leave the rest as default and click Ok. 7. go to...

Two steps to change Sharepoint Port other than 80

1.start-->administrative tools-->IIS manager-->local computer-->website-->sharepoint 80-->right click-->property-->website-->change TCP port to 808 2.start-->administrative tools-->IIS manager-->local computer-->website-->sharepoint central administrator v3-->right click-->brows-->operations-->alternate access mappings-->click internal URL(http://yourcomputer_name/)-->change that to http://yourcomputer_name:808/ Done